Has your trusty pressure cooker started losing its sizzle? Perhaps it’s taking longer to reach pressure, or worse, you’re noticing wisps of steam escaping from the lid. Chances are, the unsung hero of your culinary adventures – the sealing ring – might be the culprit. This humble component is absolutely critical for your pressure cooker’s safe and efficient operation, creating the airtight seal that makes pressure cooking possible. Ignoring a worn-out sealing ring isn’t just an inconvenience; it can compromise safety and cooking results. As someone with over a decade of hands-on experience with pressure cookers, from basic stovetop models to sophisticated electric multi-cookers, I can tell you that replacing this ring is one of the most common and essential maintenance tasks. This guide will walk you through everything you need to know, ensuring your pressure cooker continues to be a reliable partner in your kitchen.
Why Your Pressure Cooker Sealing Ring Needs Replacing
The sealing ring, also known as a gasket, is a crucial part of your pressure cooker’s safety and performance system. Over time, this component endures extreme heat, pressure, and repeated removal and insertion, leading to inevitable wear and tear.
Signs of Wear and Tear
|
Our Picks for the Best Pressure cooker in 2026
As an Amazon Associate I earn from qualifying purchases.
|
||
| Num | Product | Action |
|---|---|---|
| 1 | Instant Pot Duo 7-in-1 Electric Pressure Cooker, Slow Cooker, Rice Cooker, Steamer, Sauté, Yogurt Maker, Warmer & Sterilizer, Includes App with Over 800 Recipes, Stainless Steel, 8 Quart |

|
| 2 | Instant Pot Duo 7-in-1 Electric Pressure Cooker, Slow Cooker, Rice, Steamer, Sauté, Yogurt Maker, Warmer & Sterilizer, Includes App With Over 800 Recipes, Stainless Steel, 6 Quart |
|
| 3 | Our Place Dream Cooker - 6 Qt Ceramic Nonstick Multicooker & Pressure Cooker with Touchscreen Controls & Auto Steam Release - 4 Modes: Pressure Cook, Sauté/Sear, Slow Cook & Warm - Spice |
|
| 4 | Our Place Dream Cooker - 6 Qt Ceramic Nonstick Multicooker & Pressure Cooker with Touchscreen Controls & Auto Steam Release - 4 Modes: Pressure Cook, Sauté/Sear, Slow Cook & Warm - Steam |
|
| 5 | COSORI Pressure Cooker 6QT, Stainless Steel, 9-in-1 Multi Cooker, 12 Safety Features, Ceramic Inner Pot, Rice, Slow Cook, Sous Vide, Saute, 1100W |
|
| 6 | Instant Pot Duo 7-in-1 Mini Electric Pressure Cooker, Slow Rice Cooker, Steamer, Sauté, Yogurt Maker, Warmer & Sterilizer, Includes Free App with over 1900 Recipes, Stainless Steel, 3 Quart |
|
| 7 | Stove Top 304 Stainless Steel Pressure Cooker, One-hand Easy Handle Lid, 3 PSI Setting, 6 Safety Systems, Dishwasher Safe, Olla de Presion, Works for All Cooktops (8.5 QT) |
|
| 8 | CHEF iQ Smart Pressure Cooker with WiFi and Built-in Scale - Easy-to-Use 10-in-1 Multicooker with 500+ Guided Recipes - Rice Cooker, Slow Cooker, Instant Meals for Foodies - 6 Quart - Family Size |
|
| 9 | Our Place Dream Cooker - 6 Qt Ceramic Nonstick Multicooker & Pressure Cooker with Touchscreen Controls & Auto Steam Release - 4 Modes: Pressure Cook, Sauté/Sear, Slow Cook & Warm - Blue Salt |
|
| 10 | COMFEE' 9-in-1 Electric Pressure Cooker, 14 Presets Instant Multi Cooker Olla de Presion Non-Stick Pot Yogurt Maker Rice Cooker Slow Cooker Sauté Steamer 6 Quarts Black |
|
Recognizing when your sealing ring needs attention is the first step in maintaining your pressure cooker. A healthy sealing ring is flexible, plump, and fits snugly in its groove. However, with consistent use, you might observe several tell-tale signs of deterioration. Common indicators include cracks, tears, hardening, or a loss of elasticity, making the ring less effective at creating an airtight seal. It might also appear stretched or shrunken, no longer fitting properly. Another frequent complaint is persistent food odors that cling to the ring, transferring unwanted flavors to new dishes even after thorough washing.
 Close-up of a damaged, cracked, and discolored pressure cooker sealing ring, showing signs of wear and tear.
Impact on Performance and Safety
A compromised sealing ring directly impacts your pressure cooker’s ability to function correctly. If the ring can’t form a tight seal, the cooker won’t build or maintain the necessary pressure, resulting in longer cooking times, undercooked food, and wasted energy. More critically, a faulty sealing ring poses a significant safety risk. It can lead to steam leaks from the lid, which can cause burns. In extreme cases, a severely damaged ring could prevent the pressure cooker from reaching its internal safety mechanisms, potentially leading to dangerous pressure build-up or sudden depressurization. Regular inspection and timely replacement are paramount to ensure both culinary success and kitchen safety.
Choosing the Right Replacement Sealing Ring
Selecting the correct replacement sealing ring is not a one-size-fits-all endeavor. Just like finding the right spare tire for your car, precision is key for your pressure cooker.
Understanding Different Materials (Silicone vs. Rubber)
Sealing rings are typically made from either silicone or rubber, each with distinct properties. Rubber gaskets, common in older or traditional stovetop models, are generally more rigid and have a shorter lifespan, often requiring replacement every 1-2 years depending on usage. They can also absorb food odors more readily. Silicone rings, prevalent in modern electric pressure cookers and many newer stovetop designs, offer greater flexibility, better odor resistance, and a longer lifespan, usually lasting 2-3 years or more. While silicone rings are often more expensive, their enhanced durability and performance make them a worthwhile investment for frequent cooks.
Ensuring Compatibility (Brand and Model Specificity)
This is perhaps the most critical aspect of choosing a replacement. Pressure cooker sealing rings are highly specific to the brand and model of your appliance. A ring designed for an Instant Pot will not fit a Presto cooker, and even within the same brand, different models or sizes may require different rings. Always refer to your pressure cooker’s user manual or the manufacturer’s website to find the exact part number for your specific model. Using an ill-fitting ring, even if it seems “close enough,” will result in pressure loss and potential safety hazards. Double-check your pressure cooker’s model number, usually found on the base or the label beneath the unit, before making a purchase.
Where to Purchase Authentic Parts
To guarantee optimal performance and safety, always purchase authentic OEM (Original Equipment Manufacturer) replacement parts. Generic or off-brand rings, while sometimes cheaper, may not meet the same quality and safety standards, leading to premature wear or ineffective sealing. You can typically find authentic sealing rings directly from the pressure cooker manufacturer’s website, authorized retailers, or reputable online marketplaces. Be wary of unverified sellers, as counterfeit parts can compromise the integrity of your appliance. Many users even keep a spare ring on hand, especially for popular models, so they’re always prepared for a quick replacement.
Step-by-Step Guide: How to Replace Your Pressure Cooker Sealing Ring
Replacing your pressure cooker’s sealing ring is a straightforward task that doesn’t require specialized tools or extensive technical knowledge. Follow these simple steps to restore your cooker to its optimal performance.
Step 1: Safety First – Unplug and Cool Down
Before you begin any maintenance on your pressure cooker, ensure it is completely safe to handle. If you have an electric pressure cooker, unplug it from the power outlet. For both electric and stovetop models, confirm that the cooker is fully depressurized and completely cool to the touch. Never attempt to remove or replace the sealing ring on a hot or pressurized unit, as this can lead to severe burns or injury.
Step 2: Removing the Old Sealing Ring
Once the cooker is cool and safe, open the lid. The sealing ring is typically located in a groove on the underside of the lid. Gently grasp a section of the old ring and pull it out of the channel. It might feel a bit stiff or sticky if it’s old or has food residue. Work your way around the entire circumference of the lid until the ring is completely removed. Some models, especially certain stovetop cookers, may have small tabs or clips that hold the ring in place; simply slide the ring out from under these.
Step 3: Thoroughly Clean the Lid and Groove
With the old ring removed, take this opportunity to thoroughly clean the lid, particularly the groove where the sealing ring sits. Over time, food particles and grease can accumulate here, affecting the seal of the new ring. Use warm, soapy water and a soft cloth or sponge to meticulously clean all surfaces. Pay close attention to any nooks, crannies, and steam release components. Rinse the lid thoroughly to remove all soap residue and dry it completely before proceeding. A clean surface is essential for the new ring to seat properly and form an effective seal.
Step 4: Installing the New Sealing Ring
Now, it’s time to install your new, compatible sealing ring. Begin by ensuring the new ring is clean and dry. Many new rings benefit from a quick wash with soap and water to remove any manufacturing residues. Locate the groove on the underside of your pressure cooker lid. Start by tucking a small section of the new ring into the groove. Then, systematically work your way around the lid, gently pushing and seating the ring into the channel. Make sure the entire ring is fully seated and lies flat within the groove, without any twists, kinks, or portions protruding. For Instant Pots and similar electric multi-cookers, ensure the metal trivet in the lid is securely nestled within the sealing ring’s inner edge. Run your finger along the installed ring to confirm it’s evenly distributed and perfectly aligned.
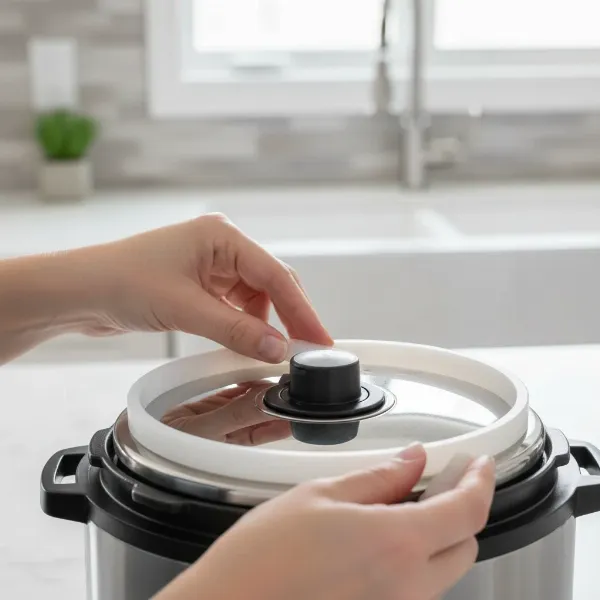 Hands carefully installing a new, clean silicone sealing ring into the groove of a pressure cooker lid.
Step 5: Performing a Water Test (Optional but Recommended)
After installing a new sealing ring, especially if it’s your first time or if you’re experiencing ongoing issues, performing a water test is a highly recommended safety and performance check. Add 2-3 cups of water to the inner pot of your pressure cooker (no food). Secure the lid, ensuring it’s properly locked, and set the pressure release valve to the “Sealing” position. Run a quick pressure cooking cycle, typically for 2-5 minutes. During this test, observe the lid for any steam leaks. A small amount of steam during the initial heating phase is normal, but once pressure is achieved, there should be no visible steam escaping from around the lid. If it seals correctly, congratulations! Your pressure cooker is ready for action. If you notice persistent leaks, check the ring’s seating and try again.
Maintaining Your Pressure Cooker Sealing Ring for Longevity
Proper care and maintenance can significantly extend the life of your sealing ring and ensure consistent performance from your pressure cooker. Simple habits can make a big difference.
Regular Cleaning Practices
After every use, remove the sealing ring from the lid and wash it thoroughly with warm, soapy water. Food residues, oils, and odors can accumulate on the ring, leading to hardening, cracking, or flavor transfer. Pay special attention to the groove where the ring sits on the lid. Many silicone rings are top-rack dishwasher safe, but always check your manufacturer’s instructions. Ensure the ring is completely dry before storing to prevent mildew or stickiness.
Proper Storage Tips
How you store your sealing ring can also impact its lifespan. If your pressure cooker is used infrequently, consider storing the lid inverted on the pot with the sealing ring removed, or at least slightly ajar. This prevents the ring from being compressed constantly, which can cause it to flatten and lose its elasticity prematurely. Some users even store the ring separately in a cool, dry place. Avoiding prolonged exposure to extreme temperatures can also help preserve its integrity.
When to Have Multiple Rings
For avid pressure cooker users, especially those who cook both savory and sweet dishes, owning multiple sealing rings is a game-changer. Silicone, while resistant, can still absorb strong odors from garlic, curries, or chili, which can then transfer to delicate desserts or yogurts. Designating one ring for savory dishes and another for sweet or neutral items completely eliminates this problem. Labeling them can help avoid confusion. This small investment enhances your cooking versatility and ensures every meal tastes exactly as intended.
Common Problems After Replacing the Sealing Ring
Even with a new sealing ring, you might encounter a few minor hiccups. Don’t worry, these issues are usually easily fixable.
Lid Not Sealing Properly
If your pressure cooker lid isn’t sealing after replacing the ring, first check that the new ring is seated perfectly in its groove without any twists or bulges. Sometimes, new rings can be a bit stiff. Try lubricating the ring lightly with a small amount of cooking oil (like vegetable oil) before inserting it. Ensure the lid is clean and free of any debris that could impede the seal. It might take a few uses for a new ring to fully “break-in” and become more pliable.
Steam Leaks
Steam leaking from the lid can be alarming, but it often points back to the sealing ring. Re-examine the ring’s placement, ensuring it’s flush all around. Check the pressure release valve and float valve components to ensure they are also clean and properly installed, as a fault there can mimic a sealing ring issue. Sometimes, the issue isn’t the ring itself, but microscopic food debris lodged in the lid’s rim or the pressure valve that prevents a perfect seal. A thorough cleaning of all lid components is always a good troubleshooting step.
Food Odor Transfer
If your new silicone ring still seems to be holding onto strong food odors, even after washing, don’t despair. Try a deep cleaning method: soak the ring in a solution of warm water and white vinegar (1 part vinegar to 2 parts water) for several hours or overnight. Alternatively, some users have success by placing the ring in the freezer for a few hours, or by running it through a dishwasher cycle with a lemon peel or a dash of baking soda. For persistent odors, remember the tip about having a dedicated ring for savory and sweet dishes.
Conclusion
Replacing the sealing ring on your pressure cooker is a fundamental maintenance task that significantly contributes to both the efficiency and safety of your appliance. By understanding when and how to replace this crucial component, choosing the right part, and committing to simple cleaning and storage practices, you ensure your pressure cooker remains a reliable and safe tool in your kitchen for years to come. Don’t let a worn-out ring dampen your culinary spirit; a fresh gasket is often all it takes to bring your pressure cooker back to life. Are you ready to confidently tackle your next pressure-cooked masterpiece?
Frequently Asked Questions
How often should a pressure cooker sealing ring be replaced?
The frequency depends on usage and material. Generally, rubber rings should be replaced every 1-2 years, while silicone rings can last 2-3 years or more. However, replace it immediately if you notice cracks, tears, hardening, loss of elasticity, or if your cooker consistently fails to seal.
Can I use any sealing ring for my pressure cooker?
No, sealing rings are highly specific to the brand, model, and size of your pressure cooker. Using an incorrect ring will lead to poor sealing, pressure loss, and can compromise safety. Always consult your appliance’s manual or the manufacturer’s website for the exact replacement part number.
Why does my new sealing ring smell?
New silicone sealing rings can sometimes have a slight manufacturing odor, which usually dissipates after a few washes or uses. If a strong food odor persists after cooking, it means the ring has absorbed flavors. Try soaking it in vinegar or baking soda, or consider having separate rings for savory and sweet dishes.
What happens if I don’t replace a worn-out sealing ring?
A worn-out sealing ring will prevent your pressure cooker from building or maintaining proper pressure, leading to longer cooking times and undercooked food. More critically, it can cause steam leaks, posing a burn hazard, and potentially compromising the safety mechanisms of the cooker, making timely replacement essential.