Imagine starting your day with a bowl of homemade yogurt, perfectly creamy, tangy, and free from unwanted additives. While making yogurt might seem like a task best left to grandmas or commercial kitchens, your Instant Pot transforms it into an incredibly simple and rewarding experience. This guide will walk you through every step, ensuring you achieve delicious, homemade yogurt with minimal fuss, turning your kitchen into a personal dairy.
Understanding the Magic of Instant Pot Yogurt Making
The Instant Pot, known for its versatility, excels at creating homemade yogurt by precisely controlling temperature. Unlike traditional methods that require constant monitoring, the Instant Pot maintains the ideal environment for beneficial bacteria to ferment milk into yogurt. This process typically involves heating milk to a high temperature to denature proteins and kill unwanted bacteria, then cooling it to a specific range before introducing a live culture. The Instant Pot’s “Yogurt” function handles the precise heating and holding temperatures, simplifying the entire procedure.
The Essential Ingredients and Tools You’ll Need
Before you begin your yogurt-making journey, gather a few key ingredients and tools to ensure a smooth and successful process.
Ingredients for Perfect Instant Pot Yogurt
- Milk: One gallon (approximately 3.8 liters) of whole milk is highly recommended for the creamiest results. You can use 2% or skim milk, but the yogurt will be thinner. Ultra-filtered milk, like Fairlife, is an excellent choice as it bypasses the initial scalding step, speeding up the process significantly.
- Yogurt Starter: This is crucial. You’ll need 2-3 tablespoons of plain, store-bought yogurt with live and active cultures. Look for labels that explicitly state “live and active cultures.” Alternatively, you can use a freeze-dried yogurt starter culture. Ensure your starter is fresh for the best results.
|
Our Picks for the Best Pressure cooker in 2026
As an Amazon Associate I earn from qualifying purchases.
|
||
| Num | Product | Action |
|---|---|---|
| 1 | Instant Pot Duo 7-in-1 Electric Pressure Cooker, Slow Cooker, Rice Cooker, Steamer, Sauté, Yogurt Maker, Warmer & Sterilizer, Includes App with Over 800 Recipes, Stainless Steel, 8 Quart |

|
| 2 | Stove Top 304 Stainless Steel Pressure Cooker, One-hand Easy Handle Lid, 3 PSI Setting, 6 Safety Systems, Dishwasher Safe, Olla de Presion, Works for All Cooktops (8.5 QT) |
|
| 3 | Instant Pot Duo 7-in-1 Electric Pressure Cooker, Slow Cooker, Rice, Steamer, Sauté, Yogurt Maker, Warmer & Sterilizer, Includes App With Over 800 Recipes, Stainless Steel, 6 Quart |
|
| 4 | COSORI Pressure Cooker 6QT, Stainless Steel, 9-in-1 Multi Cooker, 12 Safety Features, Ceramic Inner Pot, Rice, Slow Cook, Sous Vide, Saute, 1100W |
|
| 5 | Our Place Dream Cooker - 6 Qt Ceramic Nonstick Multicooker & Pressure Cooker with Touchscreen Controls & Auto Steam Release - 4 Modes: Pressure Cook, Sauté/Sear, Slow Cook & Warm - Blue Salt |
|
| 6 | COMFEE' 9-in-1 Electric Pressure Cooker, 14 Presets Instant Multi Cooker Olla de Presion Non-Stick Pot Yogurt Maker Rice Cooker Slow Cooker Sauté Steamer 6 Quarts Black |
|
| 7 | Our Place Dream Cooker - 6 Qt Ceramic Nonstick Multicooker & Pressure Cooker with Touchscreen Controls & Auto Steam Release - 4 Modes: Pressure Cook, Sauté/Sear, Slow Cook & Warm - Spice |
|
| 8 | CHEF iQ Smart Pressure Cooker with WiFi and Built-in Scale - Easy-to-Use 10-in-1 Multicooker with 500+ Guided Recipes - Rice Cooker, Slow Cooker, Instant Meals for Foodies - 6 Quart - Family Size |
|
| 9 | Instant Pot Duo 7-in-1 Mini Electric Pressure Cooker, Slow Rice Cooker, Steamer, Sauté, Yogurt Maker, Warmer & Sterilizer, Includes Free App with over 1900 Recipes, Stainless Steel, 3 Quart |
|
| 10 | Our Place Dream Cooker - 6 Qt Ceramic Nonstick Multicooker & Pressure Cooker with Touchscreen Controls & Auto Steam Release - 4 Modes: Pressure Cook, Sauté/Sear, Slow Cook & Warm - Steam |
|
Must-Have Tools and Equipment
- Instant Pot: Any model with a “Yogurt” function will work.
- Instant-Read Thermometer: Essential for accurately monitoring the milk’s temperature, especially if your Instant Pot doesn’t have a “Boil” setting for yogurt.
- Whisk: For thoroughly mixing the starter into the milk.
- Large Spoon or Ladle: For stirring and transferring milk.
- Glass Lid (Optional): Some prefer using a glass lid over the Instant Pot’s pressure lid during the “Boil” and “Ferment” cycles.
- Strainer or Colander and Cheesecloth (Optional): For making Greek yogurt.
- Clean Jars or Containers: For storing your finished yogurt.
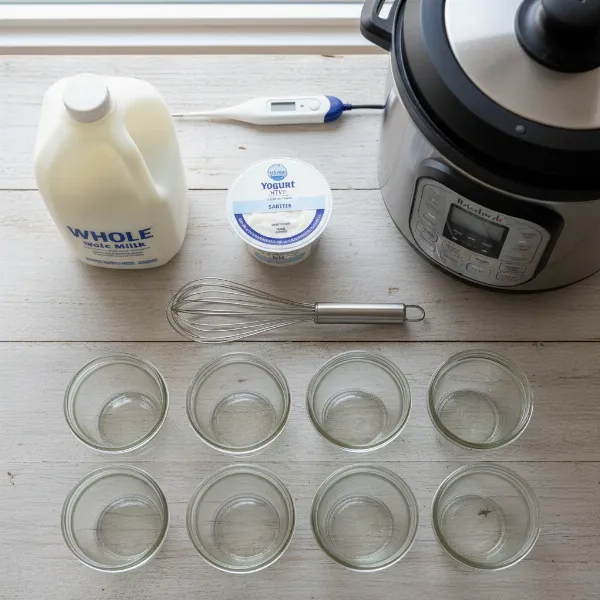 Instant Pot yogurt ingredients and tools: milk, starter, thermometer, whisk, and jars.
Step-by-Step Guide: Making Yogurt in Your Instant Pot
Follow these detailed steps to create your perfect batch of homemade Instant Pot yogurt.
Step 1: Sanitize Your Instant Pot
While not strictly mandatory for all methods, sanitizing your Instant Pot’s inner pot is a good practice to eliminate any unwanted bacteria that could interfere with your yogurt culture. Add 1 cup of water to the inner pot, secure the lid, and use the “Steam” function for 1 minute. Perform a quick release of the pressure, then carefully remove and discard the water. Ensure the pot is dry before proceeding.
Step 2: Scald the Milk
Pour one gallon of milk into your clean Instant Pot inner pot.
- Using the “Yogurt” Function’s “Boil” Setting: Place the lid on your Instant Pot (you can use a glass lid or the pressure lid, ensuring the venting knob is open or set to “Venting”). Press the “Yogurt” button repeatedly until the display shows “boil.” Press “Start.” The Instant Pot will heat the milk to approximately 180°F (82°C) or higher. This process typically takes 35-45 minutes, and the Instant Pot will beep and display “yogt” or “end” when complete.
- Using the “Sauté” Function (if no “Boil” setting or for manual control): Select “Sauté” on high. Stir the milk frequently with a whisk or large spoon to prevent scorching. Monitor the temperature with an instant-read thermometer. Heat the milk until it reaches 180°F-200°F (82°C-93°C). Once it reaches the desired temperature, press “Cancel.”
Scalding the milk is vital. It denatures the milk proteins, resulting in thicker yogurt, and eliminates any existing bacteria that could compete with your yogurt starter.
Step 3: Cool the Milk to the Ideal Temperature
This is a critical step. The milk must cool down to the ideal culturing temperature before you add the starter.
- Natural Cooling: Remove the Instant Pot inner pot and let it cool on a trivet at room temperature for 1-2 hours, stirring occasionally to speed up the process.
- Ice Bath Method: For faster cooling, place the Instant Pot inner pot in a sink filled with ice water. Stir the milk continuously until it cools to between 105°F and 115°F (40°C-46°C). Using your instant-read thermometer is essential here; temperatures outside this range can kill your starter cultures.
Step 4: Introduce Your Yogurt Starter
Once the milk has cooled to 105°F-115°F, remove about a cup of the warm milk into a separate small bowl. Add 2-3 tablespoons of your plain yogurt starter (with live cultures) to this small bowl and whisk until completely smooth. This tempering step helps the starter blend evenly without clumping. Pour this starter mixture back into the main pot of milk and whisk gently but thoroughly to ensure the cultures are evenly distributed throughout the milk.
Step 5: Ferment Your Yogurt
Place the inner pot back into the Instant Pot. Secure the lid (again, either a glass lid or the pressure lid with the venting knob open/venting). Press the “Yogurt” button. The display should show a default fermentation time (often 8 hours). You can adjust this time using the “+” and “-” buttons.
- For Milder Yogurt: Ferment for 6-8 hours.
- For Tangier Yogurt (and potentially more probiotics): Ferment for 10-12 hours, or even up to 24 hours for a very tart flavor, especially recommended if you have issues digesting dairy.
After setting the desired time, the Instant Pot will maintain the perfect temperature for fermentation. When the cycle is complete, the Instant Pot will beep and display “yogt” or “end.”
Step 6: Chill and Enjoy
Once the fermentation cycle is finished, remove the inner pot from the Instant Pot. You’ll notice the yogurt has thickened. Cover the pot with a lid or plastic wrap and transfer it to the refrigerator. Chill the yogurt for at least 4-6 hours before serving. Chilling helps the yogurt set further and develop its full flavor.
 A creamy bowl of homemade Instant Pot yogurt, chilled and ready to serve.
Troubleshooting Common Instant Pot Yogurt Issues
Even seasoned yogurt makers can encounter hiccups. Here’s how to address common problems.
Why is My Yogurt Too Thin?
If your yogurt isn’t as thick as you’d like, several factors could be at play. Ensure you scalded the milk to at least 180°F (82°C); this step is crucial for denaturing proteins and achieving a thicker consistency. Using whole milk instead of lower-fat varieties also contributes to a creamier texture. Additionally, ensure your starter yogurt is fresh and contains active cultures. If using an ultra-filtered milk, the boiling step might not be strictly necessary, but for regular milk, it’s key.
My Yogurt Didn’t Set – What Went Wrong?
The most common reasons for unset yogurt are incorrect milk temperature when adding the starter or inactive cultures. If the milk was too hot (above 115°F/46°C), it could have killed the beneficial bacteria. If it was too cold (below 105°F/40°C), the cultures might not have activated effectively. Always use an instant-read thermometer to confirm the temperature. Also, verify that your starter yogurt has “live and active cultures” and isn’t expired.
Dealing with Excessive Whey
A layer of yellowish liquid, called whey, is a natural byproduct of yogurt making. It’s perfectly normal and even nutritious. You can simply stir it back into the yogurt, or if you prefer a thicker, Greek-style yogurt, you can strain it out.
Customizing Your Homemade Instant Pot Yogurt
One of the greatest joys of homemade yogurt is the ability to tailor it to your preferences.
Making Greek Yogurt
To achieve a thicker, Greek-style yogurt, line a colander with several layers of cheesecloth (or a coffee filter) and place it over a large bowl. Pour the chilled yogurt into the lined colander. Cover and refrigerate for 2-4 hours, or even overnight, allowing the whey to drain. The longer it strains, the thicker your Greek yogurt will become. Store the strained whey in the refrigerator for use in smoothies, baking, or even plant watering.
Adding Flavors and Sweeteners
After your yogurt has chilled, you can customize it to your heart’s content. Stir in honey, maple syrup, or agave nectar for sweetness. Add vanilla extract, fresh fruit, fruit preserves, granola, nuts, or even a swirl of chocolate sauce. The possibilities are endless, allowing you to create a unique flavor profile every time.
“Making your own yogurt in an Instant Pot gives you complete control over ingredients, allowing for healthier, customized options without commercial additives.” – Chef Elena Rodriguez, Culinary Instructor & Fermentation Expert
Benefits of Making Yogurt in an Instant Pot
Beyond the satisfaction of a DIY project, making yogurt in your Instant Pot offers numerous advantages. It’s significantly more cost-effective than consistently buying store-bought yogurt, especially if your family consumes a lot. You have full control over the ingredients, avoiding artificial sweeteners, colors, and preservatives often found in commercial brands. This leads to a fresher, healthier product rich in live probiotics, which are beneficial for gut health. The Instant Pot also streamlines the process, making it easier and less time-consuming than traditional stovetop methods, giving you consistent results with minimal effort.
Conclusion
Making yogurt in your Instant Pot is a culinary revelation, transforming a seemingly complex task into an accessible and enjoyable process. With a gallon of milk, a good starter, and your trusty multi-cooker, you can create delicious, healthy, and customizable yogurt right in your own kitchen. This step-by-step guide empowers you to take control of your diet, save money, and enjoy the pure, unadulterated goodness of homemade dairy. Why not give it a try this week and experience the satisfying rewards of your own Instant Pot yogurt?
Frequently Asked Questions
How long does homemade Instant Pot yogurt last in the refrigerator?
Properly stored in airtight containers, homemade Instant Pot yogurt typically lasts for about 7 to 10 days in the refrigerator. Always ensure your containers are clean to maximize shelf life.
Can I use powdered milk to make yogurt in an Instant Pot?
Yes, you can use powdered milk, often mixed with water, to make yogurt in an Instant Pot. Many recipes suggest adding a small amount of powdered milk to regular milk to increase the protein content, which can result in a thicker yogurt.
Is it possible to make non-dairy yogurt in an Instant Pot?
While the Instant Pot’s yogurt function is designed for dairy milk, some users have experimented with making non-dairy yogurts from soy, almond, or coconut milk. However, these often require specific thickening agents and starter cultures designed for non-dairy alternatives, and results can vary.
What temperature should the milk be when adding the starter?
The milk should be cooled to a temperature between 105°F and 115°F (40°C-46°C) before adding the yogurt starter. This temperature range is crucial for activating the live cultures without killing them.
What is the purpose of straining homemade yogurt?
Straining homemade yogurt removes excess whey, resulting in a thicker, creamier consistency similar to Greek yogurt. This process also concentrates the flavors and nutrients, creating a richer product that can be used in various recipes or enjoyed on its own.