Welcoming a newborn brings immense joy, but also a whirlwind of new responsibilities, especially when it comes to keeping your little one safe and healthy. Among the many tasks, ensuring your baby’s feeding equipment is meticulously clean stands out. While washing bottles with soap and water is a daily routine, sterilization offers an extra layer of protection against harmful bacteria and germs that can impact a baby’s developing immune system. This article will guide you through using a pressure cooker, an often-overlooked yet incredibly efficient tool, to sterilize baby bottles, nipples, and pump parts, making this crucial chore quicker and more effective.
Understanding Pressure Cooker Sterilization
At its core, sterilization is the process of eliminating all bacteria, viruses, and other microorganisms from surfaces. For baby bottles, this means subjecting them to high temperatures to kill any lingering pathogens that could lead to infections or illnesses. While simple washing removes milk residue and most germs, sterilization takes hygiene a step further, providing a truly sanitized environment for your baby’s formula or breast milk.
A pressure cooker achieves sterilization through intense steam heat. By sealing liquids inside a pressurized chamber, the boiling point of water increases, generating steam that reaches temperatures far exceeding those of conventional boiling. This superheated steam penetrates every nook and cranny of your baby’s feeding gear, effectively destroying microorganisms and offering superior sanitization. It’s a method that leverages scientific principles to give parents peace of mind.
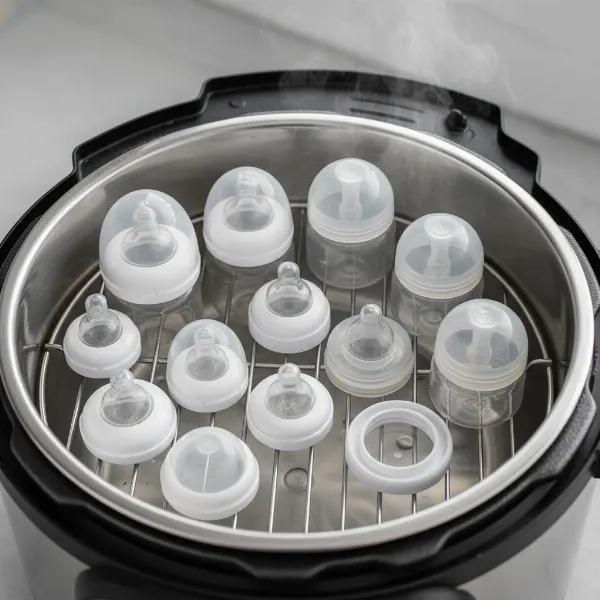 Baby bottles and pump parts arranged inside a pressure cooker for sterilization.
Why Choose a Pressure Cooker for Sterilizing Baby Bottles?
You might already use your pressure cooker for quick dinners or meal prep, but did you know it’s also a fantastic tool for baby bottle sterilization? Its unique features offer several compelling advantages over traditional methods.
Speed and Efficiency
|
Our Picks for the Best Pressure cooker in 2026
As an Amazon Associate I earn from qualifying purchases.
|
||
| Num | Product | Action |
|---|---|---|
| 1 | Our Place Dream Cooker - 6 Qt Ceramic Nonstick Multicooker & Pressure Cooker with Touchscreen Controls & Auto Steam Release - 4 Modes: Pressure Cook, Sauté/Sear, Slow Cook & Warm - Spice |

|
| 2 | Our Place Dream Cooker - 6 Qt Ceramic Nonstick Multicooker & Pressure Cooker with Touchscreen Controls & Auto Steam Release - 4 Modes: Pressure Cook, Sauté/Sear, Slow Cook & Warm - Blue Salt |
|
| 3 | Stove Top 304 Stainless Steel Pressure Cooker, One-hand Easy Handle Lid, 3 PSI Setting, 6 Safety Systems, Dishwasher Safe, Olla de Presion, Works for All Cooktops (8.5 QT) |
|
| 4 | COSORI Pressure Cooker 6QT, Stainless Steel, 9-in-1 Multi Cooker, 12 Safety Features, Ceramic Inner Pot, Rice, Slow Cook, Sous Vide, Saute, 1100W |
|
| 5 | Instant Pot Duo 7-in-1 Mini Electric Pressure Cooker, Slow Rice Cooker, Steamer, Sauté, Yogurt Maker, Warmer & Sterilizer, Includes Free App with over 1900 Recipes, Stainless Steel, 3 Quart |
|
| 6 | COMFEE' 9-in-1 Electric Pressure Cooker, 14 Presets Instant Multi Cooker Olla de Presion Non-Stick Pot Yogurt Maker Rice Cooker Slow Cooker Sauté Steamer 6 Quarts Black |
|
| 7 | Instant Pot Duo 7-in-1 Electric Pressure Cooker, Slow Cooker, Rice Cooker, Steamer, Sauté, Yogurt Maker, Warmer & Sterilizer, Includes App with Over 800 Recipes, Stainless Steel, 8 Quart |
|
| 8 | Instant Pot Duo 7-in-1 Electric Pressure Cooker, Slow Cooker, Rice, Steamer, Sauté, Yogurt Maker, Warmer & Sterilizer, Includes App With Over 800 Recipes, Stainless Steel, 6 Quart |
|
| 9 | Our Place Dream Cooker - 6 Qt Ceramic Nonstick Multicooker & Pressure Cooker with Touchscreen Controls & Auto Steam Release - 4 Modes: Pressure Cook, Sauté/Sear, Slow Cook & Warm - Steam |
|
| 10 | CHEF iQ Smart Pressure Cooker with WiFi and Built-in Scale - Easy-to-Use 10-in-1 Multicooker with 500+ Guided Recipes - Rice Cooker, Slow Cooker, Instant Meals for Foodies - 6 Quart - Family Size |
|
In the busy life of a new parent, time is a precious commodity. A pressure cooker significantly cuts down sterilization time compared to stovetop boiling. For many electric pressure cookers, like an Instant Pot, the actual high-pressure sterilization cycle can be as short as three minutes. This rapid process means you can have a batch of clean, sterile bottles ready in minutes, freeing you up for other parenting tasks or, perhaps, a much-needed moment of rest.
Powerful Germ Elimination
The enclosed, high-pressure, high-temperature environment of a pressure cooker creates an optimal condition for killing germs. The steam generated reaches temperatures above 212°F (100°C), which is highly effective against bacteria, viruses, and other pathogens that could pose a risk to your infant’s health. This thorough sanitization provides robust protection for your baby’s delicate digestive and immune systems.
Convenience and Cost-Effectiveness
If you already own a pressure cooker, using it for bottle sterilization is a cost-effective solution, eliminating the need to purchase a dedicated electric steam sterilizer. It’s also incredibly convenient, leveraging an appliance you likely already have on hand. The process is straightforward and, with a few safety precautions, integrates seamlessly into your daily routine.
Step-by-Step Guide: Sterilizing Baby Bottles with Your Pressure Cooker
Sterilizing baby bottles in a pressure cooker is a simple process once you know the steps. Follow this guide for safe and effective results.
Essential Preparation
Before you begin, ensure all bottle components (bottles, nipples, rings, caps) and breast pump parts are thoroughly washed. Use hot, soapy water and a bottle brush to remove all milk residue, then rinse them well. This initial cleaning step is crucial, as sterilization is most effective on physically clean items. Any remaining milk residue could hinder the sterilization process.
Loading the Pressure Cooker
Place a steaming rack or a trivet at the bottom of your pressure cooker. This prevents the plastic or glass bottles from directly touching the bottom of the pot, which can get extremely hot. Arrange the disassembled bottle parts on the rack, ensuring they are not tightly packed. Allow space for the steam to circulate freely around each item for optimal sterilization. Pour one cup of water into the pressure cooker, making sure it’s below the rack but sufficient to generate steam.
The Sterilization Cycle
Close the lid of your pressure cooker, ensuring the venting knob is sealed (if applicable).
- For Electric Pressure Cookers (e.g., Instant Pot): Select the “Steam” function or “Pressure Cook” on high pressure for 3 minutes. Some newer models may even have a dedicated “Sterilize” function, making the process extra foolproof.
- For Stovetop Pressure Cookers: Bring the pot up to full pressure over high heat, then immediately turn off the heat. The residual heat and pressure will continue the sterilization.
Safe Depressurization and Removal
Once the sterilization cycle is complete (or after turning off the heat for stovetop models), allow the pressure cooker to naturally release pressure. This usually takes 10-15 minutes, but refer to your pressure cooker’s manual. Do not attempt to force open the lid until the pressure has fully released and the float valve has dropped. Once depressurized, carefully open the lid away from your face to avoid residual steam. Using clean tongs, meticulously remove the hot bottle components and place them on a clean drying rack or a fresh, unused towel to air dry completely. Avoid using dish towels, as they can harbor germs.
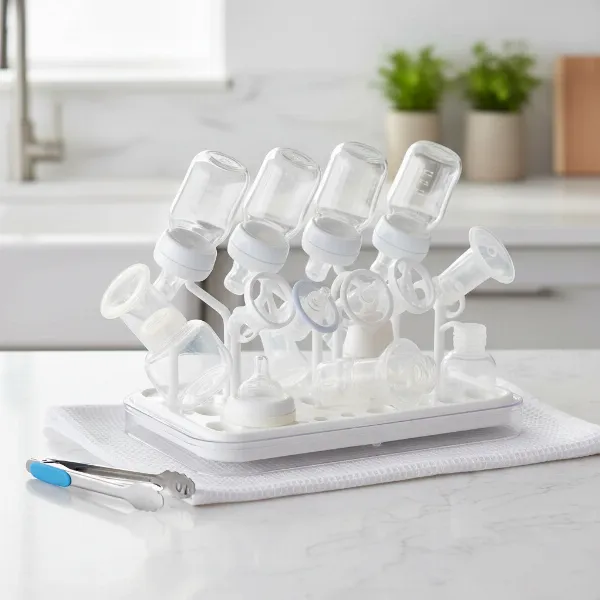 Clean, sterilized baby bottles, nipples, and pump parts air-drying on a hygienic rack.
Important Safety Tips and Best Practices
While pressure cooker sterilization is highly effective, adhering to safety guidelines is paramount to protect both you and your baby.
Bottle Material Compatibility
Most baby bottles made from plastic, glass, and silicone, along with nipples and pump parts, are safe for pressure cooker sterilization. However, always check the manufacturer’s guidelines for your specific bottles and pressure cooker to ensure compatibility and prevent damage or material degradation. Certain plastics might not withstand the high temperatures.
Avoiding Overfilling and Proper Water Levels
Never overfill your pressure cooker. Ensure bottle parts are arranged loosely to allow proper steam circulation. The amount of water added should be just enough to create steam (typically one cup), but not so much that it submerges the items or interferes with the pressure valve. Too much water can prolong the time to reach pressure and potentially cause issues.
Handling Hot Items Safely
The contents of a pressure cooker will be extremely hot immediately after depressurization. Always use clean tongs to remove sterilized items to prevent burns and re-contamination. Allow them to cool completely before handling them with bare hands or assembling them.
Storage of Sterilized Bottles
For optimal sterility, use the bottles as soon as they have cooled and dried. If you need to store them, place the assembled, dry bottles in a clean, dry, and covered container. It is recommended to use sterilized bottles within 24 hours to maintain their hygienic state and prevent the re-growth of bacteria.
Pressure Cooker Sterilization vs. Other Methods
Parents have several options for sterilizing baby bottles, each with its own merits. Understanding these can help you choose the best fit for your family.
| Method | Speed | Effectiveness | Convenience | Considerations |
|---|---|---|---|---|
| Pressure Cooker | Very Fast | Highly effective due to superheated steam | High (if you own one, set-and-forget for short cycle) | Requires proper loading, depressurization, and handling of hot items. |
| Boiling Water | Moderate (5+ mins) | Effective | Moderate (requires constant supervision) | Risk of items melting or burning if not fully submerged. |
| Electric Steam Sterilizer | Fast (6-12 mins) | Highly effective | High (dedicated appliance) | Requires counter space, additional purchase. |
| Microwave Sterilizer | Very Fast (2-6 mins) | Effective | High (compact, uses microwave) | Requires a microwave, limited capacity, hot to handle. |
| Dishwasher with Sanitize | Slow (long cycle) | Effective | High (integrated into dishwashing) | Not all dishwashers have sanitize cycle, may not reach true sterilization. |
While all methods aim for germ elimination, the pressure cooker stands out for its combination of speed and high-temperature steam power.
Boiling on the Stovetop
The traditional method involves submerging washed bottles in a pot of boiling water for at least five minutes. This is effective but requires constant attention and can be prone to items bumping and potentially damaging themselves.
Electric Steam Sterilizers
These dedicated appliances use electricity to generate steam, offering a convenient, often automated sterilization cycle. They are highly effective but require an additional purchase and counter space.
Microwave Sterilizers
These are containers designed to hold bottles and a small amount of water, which then generate steam in a microwave. They are quick and compact but have limited capacity.
Dishwasher with Sanitize Cycle
Some modern dishwashers include a “sanitize” option that uses higher water temperatures and extended wash times to kill germs. While convenient, it may not reach the same sterilization level as steam, and not all items are dishwasher-safe.
Common Misconceptions and When to Sterilize
A common question among new parents is how often bottles need to be sterilized. While sterilization is vital, understanding its role is key.
For newborns, especially premature babies or those with compromised immune systems, frequent (daily) sterilization is highly recommended to provide maximum protection against infections. However, for healthy, full-term babies beyond the initial few months (e.g., after 4 months), some pediatricians suggest that daily sterilization might not be strictly necessary, provided bottles are thoroughly washed with hot, soapy water or run through a dishwasher’s hot cycle after each use.
Despite this, many parents continue to sterilize regularly for peace of mind, and there’s certainly no harm in doing so. If you’re storing breast milk, sterilizing pump parts and bottles daily is a good practice to prevent contamination of this precious liquid. Always consult your pediatrician for personalized advice on your baby’s specific needs.
“While routine sterilization for healthy, older infants might be a personal choice, it’s absolutely non-negotiable for newborns and vulnerable babies. The intense heat of a pressure cooker offers a robust defense against unseen threats.” – Admin, PressureCookerGuides.com
Conclusion
Mastering the art of sterilizing baby bottles in a pressure cooker can significantly ease the burden of infant feeding, offering a fast, highly effective, and convenient method to ensure your baby’s health and safety. By harnessing the power of superheated steam, your pressure cooker transforms into an efficient sterilization station, killing harmful germs and providing peace of mind. Remember to always pre-wash bottles, use a steaming rack, follow the recommended pressure cooking times, and practice safe handling for the best results.
Are you ready to integrate your pressure cooker into your baby care routine?
Frequently Asked Questions
How long does it take to sterilize bottles in a pressure cooker?
For electric pressure cookers like an Instant Pot, the typical high-pressure sterilization cycle is about 3 minutes, followed by natural pressure release. For stovetop models, bring to full pressure and then immediately turn off the heat, allowing natural release.
Do I need a special rack to sterilize bottles?
Yes, using a steaming rack or trivet is recommended. This elevates the bottles from the bottom of the cooker, allowing steam to circulate effectively around all items and preventing direct contact with the hottest surface.
Can I sterilize all types of baby bottles in a pressure cooker?
Most plastic, glass, and silicone baby bottles, nipples, and pump parts are safe for pressure cooker sterilization. However, always check the manufacturer’s guidelines for your specific bottles and pressure cooker to ensure material compatibility and prevent damage.
How often should I sterilize baby bottles?
Daily sterilization is crucial for newborns, premature babies, or those with compromised immune systems. For healthy, older infants, thorough washing with hot, soapy water might suffice after the initial months, but many parents choose to continue sterilizing for extra protection. Daily sterilization is also recommended for breast milk storage equipment.
How long do sterilized bottles stay sterile?
To maintain sterility, use bottles as soon as they have cooled and dried. If stored, place them in a clean, dry, and covered container and aim to use them within 24 hours to ensure they remain free from contamination.