A pressure cooker is an indispensable kitchen appliance, revolutionizing the way we prepare meals by significantly reducing cooking times and locking in flavor. However, to ensure its continued efficiency, safety, and longevity, proper maintenance is paramount. The lid and its intricate valve system are the heart of your pressure cooker, responsible for sealing in pressure and regulating steam release. Neglecting these critical components can lead to compromised safety, inefficient cooking, and unpleasant food odors.
Maintaining a clean pressure cooker lid and its various valves isn’t just about hygiene; it’s about preserving the integrity of your appliance and safeguarding your cooking experience. Food particles, grease, and mineral deposits can accumulate in hidden crevices, blocking essential safety mechanisms and hindering the cooker’s ability to build and maintain pressure. A routine cleaning regimen for these parts will keep your pressure cooker performing like new, ensuring every meal is cooked safely and perfectly.
Why Pressure Cooker Lid and Valve Cleaning is Crucial
Regular and thorough cleaning of your pressure cooker lid and its integrated valves is more than a chore; it’s a vital aspect of ownership that contributes significantly to your kitchen safety and culinary success. Ignoring these parts can lead to several undesirable outcomes, ranging from reduced performance to potential hazards.
Ensuring Safe Operation
|
Our Picks for the Best Pressure cooker in 2026
As an Amazon Associate I earn from qualifying purchases.
|
||
| Num | Product | Action |
|---|---|---|
| 1 | Instant Pot Duo 7-in-1 Electric Pressure Cooker, Slow Cooker, Rice Cooker, Steamer, Sauté, Yogurt Maker, Warmer & Sterilizer, Includes App with Over 800 Recipes, Stainless Steel, 8 Quart |

|
| 2 | Our Place Dream Cooker - 6 Qt Ceramic Nonstick Multicooker & Pressure Cooker with Touchscreen Controls & Auto Steam Release - 4 Modes: Pressure Cook, Sauté/Sear, Slow Cook & Warm - Steam |
|
| 3 | Our Place Dream Cooker - 6 Qt Ceramic Nonstick Multicooker & Pressure Cooker with Touchscreen Controls & Auto Steam Release - 4 Modes: Pressure Cook, Sauté/Sear, Slow Cook & Warm - Spice |
|
| 4 | Stove Top 304 Stainless Steel Pressure Cooker, One-hand Easy Handle Lid, 3 PSI Setting, 6 Safety Systems, Dishwasher Safe, Olla de Presion, Works for All Cooktops (8.5 QT) |
|
| 5 | COMFEE' 9-in-1 Electric Pressure Cooker, 14 Presets Instant Multi Cooker Olla de Presion Non-Stick Pot Yogurt Maker Rice Cooker Slow Cooker Sauté Steamer 6 Quarts Black |
|
| 6 | CHEF iQ Smart Pressure Cooker with WiFi and Built-in Scale - Easy-to-Use 10-in-1 Multicooker with 500+ Guided Recipes - Rice Cooker, Slow Cooker, Instant Meals for Foodies - 6 Quart - Family Size |
|
| 7 | Our Place Dream Cooker - 6 Qt Ceramic Nonstick Multicooker & Pressure Cooker with Touchscreen Controls & Auto Steam Release - 4 Modes: Pressure Cook, Sauté/Sear, Slow Cook & Warm - Blue Salt |
|
| 8 | Instant Pot Duo 7-in-1 Mini Electric Pressure Cooker, Slow Rice Cooker, Steamer, Sauté, Yogurt Maker, Warmer & Sterilizer, Includes Free App with over 1900 Recipes, Stainless Steel, 3 Quart |
|
| 9 | Instant Pot Duo 7-in-1 Electric Pressure Cooker, Slow Cooker, Rice, Steamer, Sauté, Yogurt Maker, Warmer & Sterilizer, Includes App With Over 800 Recipes, Stainless Steel, 6 Quart |
|
| 10 | COSORI Pressure Cooker 6QT, Stainless Steel, 9-in-1 Multi Cooker, 12 Safety Features, Ceramic Inner Pot, Rice, Slow Cook, Sous Vide, Saute, 1100W |
|
The valves on your pressure cooker lid are safety mechanisms designed to regulate internal pressure and release excess steam. If these valves become clogged with food debris, starch, or grease, they may not function correctly. A blocked steam release valve could prevent pressure from being released safely, leading to a dangerous buildup of pressure inside the pot. Similarly, a compromised float valve might not properly indicate pressure, or worse, could prevent the lid from sealing or locking securely. Regular cleaning ensures these critical components are clear and operate as intended, minimizing risks and providing peace of mind.
Maintaining Cooking Efficiency
A clean pressure cooker is an efficient pressure cooker. When valves are clear and the sealing ring is free of residue, your cooker can achieve and maintain optimal pressure levels more effectively. Blockages or a dirty sealing ring can prevent a proper seal, causing the cooker to lose pressure or take longer to reach the desired cooking temperature. This not only wastes energy but also extends cooking times, defeating the very purpose of using a pressure cooker. Consistent cleaning guarantees that your appliance functions at its peak, delivering fast, consistent results every time.
Preventing Odors and Residue Buildup
Pressure cookers, especially their silicone sealing rings, can easily absorb and retain food odors over time. Imagine cooking a savory stew and then a delicate dessert, only to have your cake subtly flavored with garlic. Beyond odors, neglected food particles and grease can harden, making future cleaning more difficult and creating a breeding ground for bacteria. Regular cleaning, particularly for the sealing ring and valves, prevents these unwanted smells from lingering and ensures that your food always tastes fresh and clean, free from cross-contamination of flavors or unsanitary residue.
Understanding Your Pressure Cooker Lid Components
Before you begin the cleaning process, it’s helpful to understand the key components of your pressure cooker lid. While models may vary slightly, most modern pressure cooker lids feature several removable parts vital for safe and effective operation. Knowing what each part does will guide you in disassembling and cleaning them thoroughly.
The main components typically include the sealing ring (or gasket), a flexible silicone or rubber ring that creates an airtight seal between the lid and the pot. The steam release valve (or pressure release handle) controls the release of steam from the cooker. Beneath the lid, you’ll often find an anti-block shield, a small metal cover that prevents food particles from blocking the steam release pipe. Lastly, the float valve is a small metal pin with a silicone cap that rises when pressure builds, indicating that the cooker is pressurized. Each of these parts plays a crucial role and requires specific attention during cleaning.
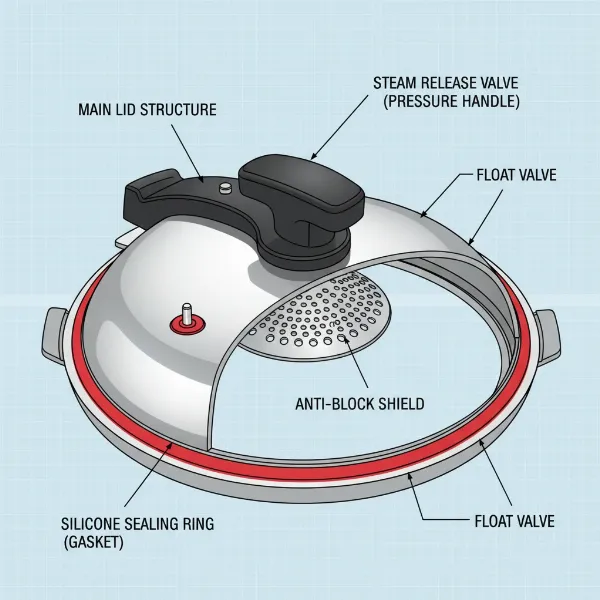 Detailed diagram of pressure cooker lid components: sealing ring, steam release valve, anti-block shield, float valve.
Step-by-Step Guide to Cleaning Your Pressure Cooker Lid
Proper cleaning of your pressure cooker lid involves careful disassembly, thorough washing of each component, and meticulous reassembly. Follow these steps to ensure your pressure cooker remains in top condition.
Preparation and Disassembly
Always ensure your pressure cooker is unplugged and completely cooled before you begin any cleaning. Safety first! Once cool, carefully remove the lid from the cooker base.
- Remove the Sealing Ring: Gently pull the large silicone or rubber sealing ring from its groove on the underside of the lid. This part is prone to absorbing odors and collecting food particles.
- Remove the Steam Release Handle: Most steam release handles can be gently pulled straight off the steam release pipe on the top of the lid. Check your specific model’s manual if it seems resistant.
- Remove the Anti-Block Shield: On the underside of the lid, you’ll typically find a small metal shield covering the steam release pipe. This can usually be popped off by gently pushing it with your thumb or a finger. This shield prevents food from blocking the steam vent.
- Remove the Float Valve: From the underside of the lid, locate the small silicone cap or grommet anchoring the float valve pin. Gently pull off this silicone cap, and the float valve pin should then fall out from the top of the lid. These are small parts, so set them aside carefully to avoid losing them.
Cleaning Each Component
Once all removable parts are detached, you can begin cleaning. A mild dish soap and warm water are your primary tools. For stubborn stains or odors, white distilled vinegar can be beneficial.
- The Lid Itself: Hand-wash the entire lid with warm, soapy water and a soft sponge or microfiber cloth. Pay close attention to any grooves or recessed areas where food might accumulate. Some pressure cooker lids are dishwasher safe (usually on the top rack), but check your manufacturer’s instructions. If hand-washing, ensure you scrub both the inner and outer surfaces.
- The Sealing Ring: Wash the sealing ring thoroughly with warm, soapy water. If it retains odors, soak it in a solution of white vinegar and water for 30 minutes, or you can run it through the dishwasher on the top rack. Inspect the ring for any cracks, tears, or deformation. A damaged sealing ring can prevent a proper seal and should be replaced.
- The Steam Release Handle/Valve: Wash the handle with warm, soapy water. Use a small brush (like an old toothbrush) to clean inside the handle and any crevices around the steam release pipe on the lid. Important Note: The actual steam valve assembly often should not be fully disassembled or removed from the lid itself, only its outer handle or cover. Consult your manual.
- The Anti-Block Shield: Clean this small metal shield with warm, soapy water, using a small brush to remove any trapped food particles. Ensure it’s perfectly clear.
- The Float Valve: Wash both the metal pin of the float valve and its silicone cap with warm, soapy water. Make sure the pin can move freely within the lid’s opening once reassembled. Any sticky residue here can prevent the float valve from rising or falling correctly.
Drying and Reassembly
Thorough drying is crucial to prevent mold, mildew, and odors.
- Air Dry All Parts: After washing, place all components on a clean towel or drying rack and allow them to air dry completely. Avoid reassembling while still damp.
- Reassemble Carefully: Once dry, reassemble the parts in reverse order of disassembly.
- Insert the float valve pin into its hole from the top of the lid.
- Secure the float valve with its silicone cap from the underside of the lid, ensuring it’s firmly in place and the pin moves freely.
- Snap the anti-block shield back into place on the underside of the lid, covering the steam release pipe.
- Push the steam release handle back onto the steam release pipe on the top of the lid.
- Finally, press the sealing ring back into its groove on the underside of the lid, making sure it is seated evenly and securely all the way around.
Essential Cleaning Tools You’ll Need
Having the right tools makes the cleaning process much easier and more effective. You likely already have most of these in your kitchen.
- Mild Dish Soap: Essential for breaking down grease and food residue.
- Warm Water: Helps loosen grime and makes soap more effective.
- Soft Sponge or Microfiber Cloth: Gentle enough for the lid’s surface, yet effective for scrubbing.
- Small, Soft-Bristled Brush (e.g., old toothbrush): Perfect for reaching into tight crevices in and around the valves and shield.
- White Distilled Vinegar: An excellent natural deodorizer and stain remover for the sealing ring and for tackling mineral deposits.
- Clean Drying Towel or Drying Rack: For air-drying all components completely.
Common Cleaning Mistakes to Avoid
Even with the best intentions, it’s easy to fall into common cleaning traps that can damage your pressure cooker or reduce its effectiveness. Being aware of these pitfalls can save you time and money.
One significant mistake is using abrasive sponges, steel wool, or harsh chemical cleaners. These can scratch the stainless steel surface of your lid or damage the delicate silicone components, potentially compromising the pressure seal or safety features. Another common error is neglecting to disassemble all the small parts, particularly the float valve and anti-block shield. Food particles love to hide in these areas, leading to blockages that can affect pressure regulation. Many users also fail to dry components thoroughly before reassembly, which can foster mold growth, particularly on the silicone sealing ring, and lead to persistent odors. Always allow everything to air dry completely. Lastly, ignoring the manufacturer’s specific cleaning instructions for your model can lead to accidental damage or improper cleaning, so a quick glance at your manual is always a good idea.
“A well-maintained pressure cooker is a safe pressure cooker. Don’t underestimate the power of a quick, thorough clean after each use to extend its life and ensure every meal is a success.”
Conclusion
A clean pressure cooker lid and properly functioning valves are not just about aesthetics; they are fundamental to the safety, efficiency, and longevity of your appliance. By regularly disassembling and cleaning the sealing ring, steam release handle, anti-block shield, and float valve, you prevent dangerous blockages, eliminate lingering odors, and ensure your pressure cooker performs optimally every time. Embrace this simple yet crucial maintenance routine, and your pressure cooker will remain a reliable, high-performing asset in your kitchen for years to come.
What cleaning tips have you found most effective in keeping your pressure cooker in prime condition?
Frequently Asked Questions
Can I put my pressure cooker lid in the dishwasher?
Many modern pressure cooker lids, especially those for electric models, are top-rack dishwasher safe. However, always consult your specific pressure cooker’s manual to confirm, as some traditional or older models may require hand-washing to prevent damage to seals or other components.
How often should I clean the valves?
It’s recommended to give the steam release handle, anti-block shield, and float valve a quick clean after every use to prevent food particle buildup. A more thorough deep clean, involving full disassembly of these parts, should be performed periodically or whenever you notice any stickiness or reduced performance.
How do I get rid of odors from the sealing ring?
The silicone sealing ring can absorb food odors. To eliminate these, wash the ring with warm, soapy water. If odors persist, soak the ring in white distilled vinegar for 30 minutes, or try running it through a dishwasher on the top rack. Some users also keep separate sealing rings for savory and sweet dishes.