Embarking on a new culinary adventure with a pressure cooker can be both exciting and a little daunting. This powerful appliance promises speed and efficiency, but its unique operation requires a proper introduction. Before you whip up your first gourmet meal, an initial “water test” is not just recommended, it’s an essential rite of passage. This simple dry run, using only water, is your opportunity to familiarize yourself with the machine, ensure all components are functioning perfectly, and build the confidence you need for safe and effective pressure cooking. This guide will walk you through every step, from preparation to troubleshooting, ensuring your pressure cooker journey begins on the right foot.
What is a Pressure Cooker Water Test?
A pressure cooker water test is a crucial initial run of your new appliance using only water, without any food. It’s akin to taking a new car for a test drive before a long trip. The primary purpose is to observe how your pressure cooker functions through its various cycles—preheating, pressurizing, maintaining pressure, and releasing it—without the risk of wasting ingredients. This hands-on experience helps you understand the sounds, lights, and mechanisms unique to your specific model.
Why the Initial Water Test is Essential
Performing the water test is more than just a suggestion; it’s a foundational step that sets the stage for a safe and successful pressure cooking experience.
Familiarizing Yourself with Your Appliance
|
Our Picks for the Best Pressure cooker in 2026
As an Amazon Associate I earn from qualifying purchases.
|
||
| Num | Product | Action |
|---|---|---|
| 1 | COSORI Pressure Cooker 6QT, Stainless Steel, 9-in-1 Multi Cooker, 12 Safety Features, Ceramic Inner Pot, Rice, Slow Cook, Sous Vide, Saute, 1100W |

|
| 2 | Our Place Dream Cooker - 6 Qt Ceramic Nonstick Multicooker & Pressure Cooker with Touchscreen Controls & Auto Steam Release - 4 Modes: Pressure Cook, Sauté/Sear, Slow Cook & Warm - Steam |
|
| 3 | Our Place Dream Cooker - 6 Qt Ceramic Nonstick Multicooker & Pressure Cooker with Touchscreen Controls & Auto Steam Release - 4 Modes: Pressure Cook, Sauté/Sear, Slow Cook & Warm - Blue Salt |
|
| 4 | Instant Pot Duo 7-in-1 Mini Electric Pressure Cooker, Slow Rice Cooker, Steamer, Sauté, Yogurt Maker, Warmer & Sterilizer, Includes Free App with over 1900 Recipes, Stainless Steel, 3 Quart |
|
| 5 | CHEF iQ Smart Pressure Cooker with WiFi and Built-in Scale - Easy-to-Use 10-in-1 Multicooker with 500+ Guided Recipes - Rice Cooker, Slow Cooker, Instant Meals for Foodies - 6 Quart - Family Size |
|
| 6 | Instant Pot Duo 7-in-1 Electric Pressure Cooker, Slow Cooker, Rice, Steamer, Sauté, Yogurt Maker, Warmer & Sterilizer, Includes App With Over 800 Recipes, Stainless Steel, 6 Quart |
|
| 7 | Instant Pot Duo 7-in-1 Electric Pressure Cooker, Slow Cooker, Rice Cooker, Steamer, Sauté, Yogurt Maker, Warmer & Sterilizer, Includes App with Over 800 Recipes, Stainless Steel, 8 Quart |
|
| 8 | COMFEE' 9-in-1 Electric Pressure Cooker, 14 Presets Instant Multi Cooker Olla de Presion Non-Stick Pot Yogurt Maker Rice Cooker Slow Cooker Sauté Steamer 6 Quarts Black |
|
| 9 | Our Place Dream Cooker - 6 Qt Ceramic Nonstick Multicooker & Pressure Cooker with Touchscreen Controls & Auto Steam Release - 4 Modes: Pressure Cook, Sauté/Sear, Slow Cook & Warm - Spice |
|
| 10 | Stove Top 304 Stainless Steel Pressure Cooker, One-hand Easy Handle Lid, 3 PSI Setting, 6 Safety Systems, Dishwasher Safe, Olla de Presion, Works for All Cooktops (8.5 QT) |
|
Unboxing a new pressure cooker can be exciting, but the array of buttons, valves, and settings can also be overwhelming. The water test offers a no-stress environment to learn your appliance’s behavior. You’ll observe the float valve rise, hear the steam release, and understand how the lid locks and unlocks. This firsthand experience demystifies the process, making you more comfortable with its operation before you introduce actual food. Understanding these mechanics is vital, as many recipes often assume a basic knowledge of pressure cooker functions.
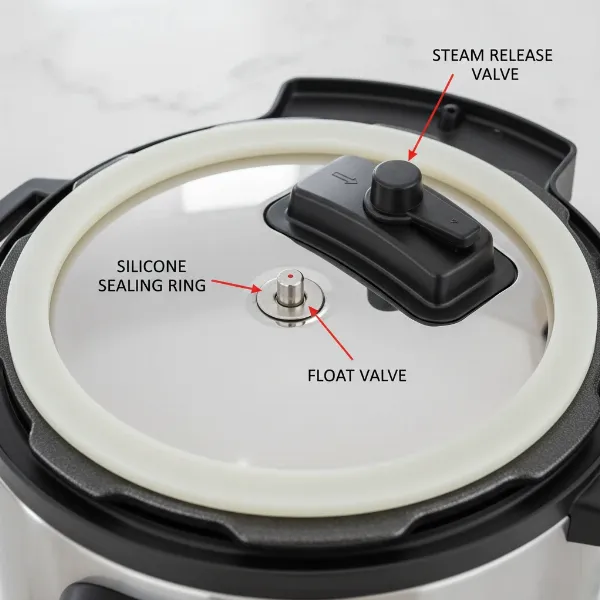 Close-up of a pressure cooker lid, highlighting sealing ring, float valve, and steam release valve.
Ensuring Proper Sealing and Functionality
The core of pressure cooking relies on an airtight seal to build and maintain high pressure. The water test acts as an immediate diagnostic tool. It allows you to check if the sealing ring is properly seated, if the steam release valve functions as intended, and if the float valve correctly pops up to indicate full pressure. Catching any manufacturing defects or installation errors during this initial run prevents potential issues, like steam leaks or failure to pressurize, which could lead to undercooked food or safety concerns down the line. This proactive check safeguards your future cooking endeavors.
Building Confidence for Culinary Success
For many, the idea of cooking under high pressure can be intimidating. The water test helps to alleviate this anxiety by providing a controlled learning environment. By successfully completing the test, you gain practical experience and confidence in your ability to operate the cooker safely. You’ll understand the expected sounds and visual cues, making you less likely to second-guess the process when cooking with ingredients that matter. This boosted confidence empowers you to explore a wider range of pressure cooker recipes, transforming you from a hesitant user into an adventurous chef.
Preparing for Your Pressure Cooker’s First Run
Before you begin the water test, a few simple preparations will ensure a smooth and safe experience.
Safety First: Pre-Test Checklist
Prioritizing safety is paramount when operating any new kitchen appliance. Always begin by thoroughly reading your pressure cooker’s user manual. This document contains specific instructions, safety warnings, and operating guidelines unique to your model. Next, carefully inspect all removable components: the sealing ring, float valve, and steam release valve. Ensure the sealing ring is free of any tears or damage and is correctly seated in the lid. Check that the float valve moves freely and that the steam release valve is clear of any obstructions. Finally, prepare a clear, stable workspace on your countertop, away from overhead cabinets or anything that could be damaged by steam.
What You’ll Need
Gathering your minimal supplies beforehand makes the process quick and efficient:
- Your Pressure Cooker: Ensure it’s clean and assembled.
- Inner Pot: This must always be inside the cooker base when operating.
- Lid: With the sealing ring properly installed.
- Water: Approximately 2 to 3 cups (750ml). Using lukewarm or warm water can help speed up the pressurization process, especially if your tap water is very cold.
- Measuring Cup: For accurate water measurement.
Step-by-Step Guide: Performing the Water Test
The process for performing a water test is straightforward, especially for electric models. While stovetop pressure cookers follow a similar principle, their operational details will differ.
For Electric Pressure Cookers (e.g., Instant Pot)
The majority of modern pressure cookers are electric, offering user-friendly interfaces. Here’s a detailed guide for their initial water test:
- Step 1: Place the Inner Pot & Add Water. Ensure the inner pot is correctly seated within the pressure cooker’s base. Never pour liquid directly into the cooker base without the inner pot. Add 2 to 3 cups of water to the inner pot.
- Step 2: Inspect and Install the Sealing Ring. Before placing the lid, double-check that the silicone sealing ring is firmly and correctly installed around the lid’s rim. Run your finger along it to ensure there are no bulges, gaps, or twists. A properly installed ring is crucial for an airtight seal.
- Step 3: Secure the Lid. Place the lid on the cooker, aligning the arrow on the lid with the indicator on the base. Turn the lid clockwise until it locks into place. You will typically hear a chime or a locking sound.
- Step 4: Set the Steam Release Valve to “Sealing.” Locate the steam release valve (often a knob or switch) on the lid. Rotate or position it to the “Sealing” (or “Closed”) position. This is a critical step, as an open valve will prevent pressure from building. Some models, like the Instant Pot Ultra, automatically set to “Sealing” when the lid is closed.
- Step 5: Select “Pressure Cook” or “Manual” and Set Time. Plug in your pressure cooker. Select the “Pressure Cook” or “Manual” setting. Ensure it’s set to “High Pressure” (which is usually the default). Use the +/- buttons or dial to set the cooking time to 2 to 5 minutes.
- Step 6: Observe the Pressure Build-Up. After a few seconds, the display may show “On” or “Preheating” as the cooker begins to heat the water. Steam will start to escape from the float valve initially, which is normal. As pressure builds, the small metal float valve on the lid will pop up, indicating that the cooker is fully pressurized and the lid is locked. The cooking timer will then begin to count down. This phase can take 5-15 minutes, or even longer depending on the water temperature and cooker size.
- Step 7: Natural Release (Optional). Once the cooking time finishes, the cooker will beep and often switch to a “Keep Warm” setting. If you wish to observe a natural pressure release, simply let the cooker cool down on its own. The float valve will drop when pressure has fully dissipated.
- Step 8: Quick Release (Vent Steam Safely). To perform a quick release, carefully turn the steam release valve to the “Venting” (or “Open”) position. Stand clear of the valve, as a strong jet of steam will rapidly escape. The float valve will drop down once all the pressure has been released.
- Step 9: Open the Lid and Drain. Once the float valve has dropped, it is safe to twist and open the lid. Carefully remove the inner pot, drain the water, and wipe dry all components.
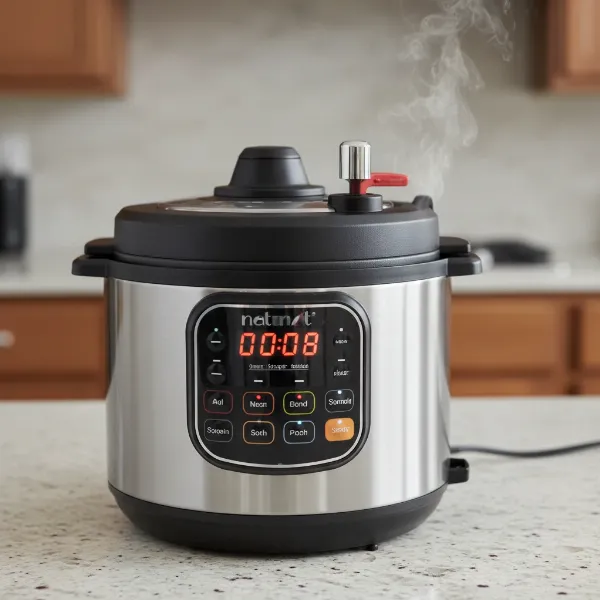 Electric pressure cooker with its float valve raised, indicating it has reached full pressure.
Considerations for Stovetop Pressure Cookers
While the fundamental goal of the water test remains the same for stovetop models, the operational steps differ. Stovetop pressure cookers require an external heat source and typically use either a weighted jiggle top or a spring valve system to regulate pressure. You will still add water, secure the lid, and bring the cooker to pressure on a stovetop burner. Observe the pressure indicator (weight jiggling or pin rising) and listen for the characteristic sounds. Releasing pressure involves either removing the weight (for jiggle-top models) or using a steam release button/valve. Always consult your specific stovetop pressure cooker’s manual for precise instructions.
What to Expect During the Water Test
Knowing what to anticipate during each phase of the water test can help you distinguish normal operation from potential issues.
Preheating Phase
When you initiate the cooking program, your pressure cooker will enter the preheating phase. For electric models, the display often shows “On.” During this time, the heating element is working to bring the water inside to a boil and generate steam. It’s normal for some steam to escape from around the float valve or even the lid initially, as the cooker hasn’t yet reached full pressure and created an airtight seal. This phase can take anywhere from 5 to 15 minutes, depending on the amount and temperature of water, and the cooker’s wattage. Using warm water can help reduce this time.
Pressurization and Float Valve
As sufficient steam builds inside the cooker, the internal pressure increases. This pressure will force the small metal float valve on the lid upwards, sealing the cooker completely. When the float valve pops up, it’s a clear visual cue that your pressure cooker has reached full operating pressure and the lid is now safely locked. For electric models, this is also when the cooking timer will typically begin its countdown. Do not attempt to force the lid down or open it if the float valve is still up, as this indicates the presence of high pressure.
Steam Release
There are generally two methods for releasing pressure:
- Quick Release (QR): This involves manually opening the steam release valve. You’ll hear a distinct, loud whooshing sound as a forceful jet of steam escapes. This method rapidly depressurizes the cooker, stopping the cooking process quickly. Always keep your hands and face away from the steam vent to avoid burns.
- Natural Release (NR): This method involves simply allowing the pressure cooker to cool down naturally. As it cools, the internal pressure gradually decreases on its own. The float valve will slowly drop back down once all the pressure has dissipated, indicating it’s safe to open the lid. This method is often used for foamy foods or larger cuts of meat to prevent scorching or breakdown.
Troubleshooting Common Water Test Issues
Sometimes, the water test doesn’t go exactly as planned. Don’t panic; many common issues are easily resolved.
Pressure Not Building or Excessive Steam Leakage
If your pressure cooker isn’t building pressure, or if you notice a continuous, significant amount of steam leaking throughout the preheating and cooking cycle, check these points:
- Lid Not Sealed Properly: Ensure the lid is twisted fully clockwise and properly locked into place.
- Sealing Ring Issues: Remove the sealing ring and re-install it, making sure it’s snugly fitted and free of twists, food debris, or damage. A damaged ring will prevent a proper seal.
- Steam Release Valve Position: Confirm the steam release valve is firmly set to the “Sealing” (closed) position. A common mistake is leaving it on “Venting.”
- Float Valve Blocked: Check that the float valve area on the lid is clean and not blocked by any debris, allowing it to move freely.
Longer-Than-Expected Pressurization
If your cooker takes an unusually long time to come to pressure (e.g., more than 15-20 minutes for 2-3 cups of water):
- Cold Water: Starting with ice-cold water will significantly extend preheating time. Use warm tap water to speed up the process.
- Sauté Function: For electric pressure cookers, you can preheat the inner pot on the “Sauté” setting with the water for a few minutes before closing the lid and starting the pressure cooking program.
- Minor Seal Leak: A very slow, intermittent leak from the lid or valve can also prolong pressurization. Re-check all sealing points.
What if the Float Valve Doesn’t Pop Up?
The float valve is your primary indicator of pressure. If it doesn’t pop up:
- Steam Release Valve: The most common reason is that the steam release valve is not in the “Sealing” position. Double-check and adjust it.
- Insufficient Liquid: While unlikely with 2-3 cups of water, insufficient liquid means not enough steam can be generated to build pressure.
- Defective Unit: If all checks fail and you’ve followed the steps precisely, there might be a defect. Contact the manufacturer’s customer service for assistance.
Beyond the Water Test: Next Steps
Congratulations! You’ve successfully completed the water test and proven your pressure cooker is ready for action.
Cleaning and Maintenance: After the water test, always wash the inner pot, lid, and sealing ring thoroughly. The sealing ring may absorb odors, so a good wash is essential. Ensure all parts are completely dry before storing your cooker.
Start with Simple Recipes: Now that you’re comfortable with the basics, begin your pressure cooking journey with simple, forgiving recipes. Broths, hard-boiled eggs, or steamed vegetables are excellent starting points to further build your confidence before tackling more complex dishes.
Conclusion
The initial water test is an indispensable step for any new pressure cooker owner, transforming a complex appliance into a familiar kitchen tool. By dedicating a few minutes to this simple run, you gain invaluable experience in how your pressure cooker functions, confirm its safe and proper operation, and build the confidence necessary to explore the vast potential of pressure cooking. This small investment of time upfront will save you frustration and ensure delicious results for years to come. So, embrace the test, understand your appliance, and get ready to revolutionize your cooking. What exciting dish will you prepare first with your newly mastered pressure cooker?
Frequently Asked Questions
Is the water test mandatory for all pressure cookers?
While not always strictly “mandatory” by manufacturers, performing an initial water test is highly recommended for all new pressure cookers, especially electric models. It serves as a crucial learning experience and a preliminary check of your appliance’s functionality.
How much water should I use for the water test?
Most manufacturers and guides recommend using 2 to 3 cups (approximately 750ml) of water for the initial water test. This amount is sufficient to generate enough steam for the cooker to come to pressure.
How long does the water test typically take?
The entire water test, including preheating, pressurizing, and depressurizing, usually takes between 15 to 25 minutes. The preheating phase alone can account for 5-15 minutes, depending on the water temperature and the cooker model.
Can I skip the water test if I’ve used pressure cookers before?
Even experienced pressure cooker users can benefit from a water test when acquiring a new model. Each appliance can have slightly different controls, sounds, and operational nuances. It’s a quick way to ensure the specific unit is working correctly without risking food.
What if my pressure cooker makes strange noises during the test?
Some hissing or gurgling sounds are normal during the preheating phase as steam begins to build. However, if you hear unusually loud noises, excessive sputtering, or grinding, stop the test, unplug the unit, and consult your user manual or the manufacturer’s support.