In the world of pressure cooking, the gasket is the unsung hero, silently working to create the airtight seal that makes this cooking method so efficient and safe. As an experienced technician with over a decade in pressure cooker repair and usage, I understand the critical role this seemingly simple ring plays. Without a healthy gasket, your pressure cooker cannot achieve or maintain the necessary pressure, leading to longer cooking times, decreased food quality, and potential safety concerns. Knowing when to replace this vital component isn’t just about maintenance; it’s about ensuring your culinary adventures remain smooth, safe, and delicious.
Understanding Your Pressure Cooker Gasket: The Heart of the Seal
A pressure cooker gasket, often called a sealing ring, is a crucial component typically made from durable silicone or rubber. Its primary function is to form a perfect, airtight seal between the pressure cooker’s lid and its body, trapping steam and allowing pressure to build inside. This high-pressure environment is what drastically reduces cooking times, tenderizes food quickly, and even locks in more nutrients and flavors than conventional cooking methods. When this seal is compromised, the entire pressure cooking process falters, making the gasket the true heart of your cooker’s performance.
The Science Behind Gasket Wear: Why They Don’t Last Forever
While robust, pressure cooker gaskets are subjected to extreme conditions—intense heat, high pressure, and repeated cycles of expansion and contraction. Over time, this constant stress leads to a phenomenon known as “elastomer fatigue” or “thermal set.” Essentially, the polymer chains in the gasket material lose their elastic memory, meaning they can no longer fully rebound to their original shape after being compressed and heated.
Several factors accelerate this wear and tear: frequent use, exposure to cooking oils and acidic foods, and improper cleaning agents. Even if a gasket appears visually intact, its internal structure can be compromised, preventing it from forming an effective seal. This degradation is why regular inspection and timely replacement are paramount, not just for efficiency but for the safe operation of your appliance.
Clear Signs It’s Time for a New Pressure Cooker Gasket
Recognizing the early warning signs of a failing gasket can prevent frustrating cooking failures and potential safety issues. Pay close attention to these indicators:
Visible Damage: Cracks, Tears, and Brittleness
|
Our Picks for the Best Pressure cooker in 2026
As an Amazon Associate I earn from qualifying purchases.
|
||
| Num | Product | Action |
|---|---|---|
| 1 | Our Place Dream Cooker - 6 Qt Ceramic Nonstick Multicooker & Pressure Cooker with Touchscreen Controls & Auto Steam Release - 4 Modes: Pressure Cook, Sauté/Sear, Slow Cook & Warm - Steam |

|
| 2 | Our Place Dream Cooker - 6 Qt Ceramic Nonstick Multicooker & Pressure Cooker with Touchscreen Controls & Auto Steam Release - 4 Modes: Pressure Cook, Sauté/Sear, Slow Cook & Warm - Spice |
|
| 3 | COSORI Pressure Cooker 6QT, Stainless Steel, 9-in-1 Multi Cooker, 12 Safety Features, Ceramic Inner Pot, Rice, Slow Cook, Sous Vide, Saute, 1100W |
|
| 4 | Instant Pot Duo 7-in-1 Electric Pressure Cooker, Slow Cooker, Rice Cooker, Steamer, Sauté, Yogurt Maker, Warmer & Sterilizer, Includes App with Over 800 Recipes, Stainless Steel, 8 Quart |
|
| 5 | Instant Pot Duo 7-in-1 Electric Pressure Cooker, Slow Cooker, Rice, Steamer, Sauté, Yogurt Maker, Warmer & Sterilizer, Includes App With Over 800 Recipes, Stainless Steel, 6 Quart |
|
| 6 | COMFEE' 9-in-1 Electric Pressure Cooker, 14 Presets Instant Multi Cooker Olla de Presion Non-Stick Pot Yogurt Maker Rice Cooker Slow Cooker Sauté Steamer 6 Quarts Black |
|
| 7 | Instant Pot Duo 7-in-1 Mini Electric Pressure Cooker, Slow Rice Cooker, Steamer, Sauté, Yogurt Maker, Warmer & Sterilizer, Includes Free App with over 1900 Recipes, Stainless Steel, 3 Quart |
|
| 8 | CHEF iQ Smart Pressure Cooker with WiFi and Built-in Scale - Easy-to-Use 10-in-1 Multicooker with 500+ Guided Recipes - Rice Cooker, Slow Cooker, Instant Meals for Foodies - 6 Quart - Family Size |
|
| 9 | Stove Top 304 Stainless Steel Pressure Cooker, One-hand Easy Handle Lid, 3 PSI Setting, 6 Safety Systems, Dishwasher Safe, Olla de Presion, Works for All Cooktops (8.5 QT) |
|
| 10 | Our Place Dream Cooker - 6 Qt Ceramic Nonstick Multicooker & Pressure Cooker with Touchscreen Controls & Auto Steam Release - 4 Modes: Pressure Cook, Sauté/Sear, Slow Cook & Warm - Blue Salt |
|
The most obvious signs are physical. Regularly inspect your gasket for any visible cracks, cuts, tears, or signs of warping. A healthy gasket should be smooth and pliable. If it looks dry, brittle, or hardened, it’s losing its essential flexibility and integrity. A simple “thumbnail test” can reveal brittleness: if pressing your thumbnail into the gasket leaves a permanent dent, it’s likely too hard and needs replacing.
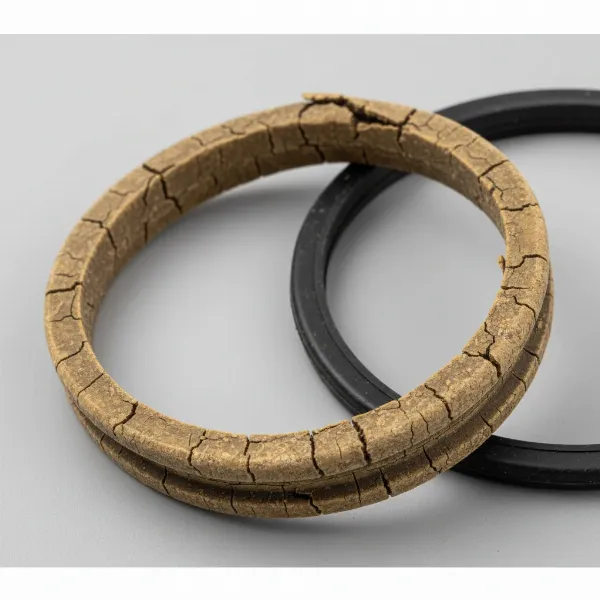 Close-up of a damaged pressure cooker gasket with visible cracks and brittleness.
Performance Issues: Leaking Steam and Slow Pressure Buildup
If you notice steam consistently escaping from around the lid’s rim during cooking, or if your pressure cooker struggles to build pressure, the gasket is almost certainly the culprit. An old or stretched gasket can’t compress effectively, allowing steam to leak and preventing the internal pressure from rising adequately. Consequently, food will take longer to cook, or may not cook thoroughly at all, diminishing the primary benefits of pressure cooking.
Texture and Fit Changes: Hardening, Softening, or Stretching
A healthy gasket should feel supple and fit snugly into its groove. If it becomes too hard and inflexible, or conversely, too soft and sticky, it won’t create a reliable seal. Similarly, a gasket that appears shrunken or stretched, making it difficult to seat properly in the lid, is a clear sign of degradation. If the lid closes with surprisingly little resistance, it suggests the gasket has lost its critical thickness and compression force.
Persistent Odors and Residue
While not dangerous, a gasket that retains food smells even after thorough cleaning indicates the material has become porous or degraded. This odor retention can subtly affect the taste of your food and signals that the gasket’s polymer matrix is no longer performing optimally. If deep cleaning doesn’t resolve the issue, replacement is the best solution.
The “Snap Test”
A highly reliable diagnostic is the “3-Second Snap Test.” Gently stretch a 3-inch section of your gasket to about 5 inches, then release it. A healthy gasket should snap back to its original shape in less than one second. If it takes longer, or returns but appears slightly wavy or oval, it has lost its vital rebound energy due to thermal set and is due for replacement.
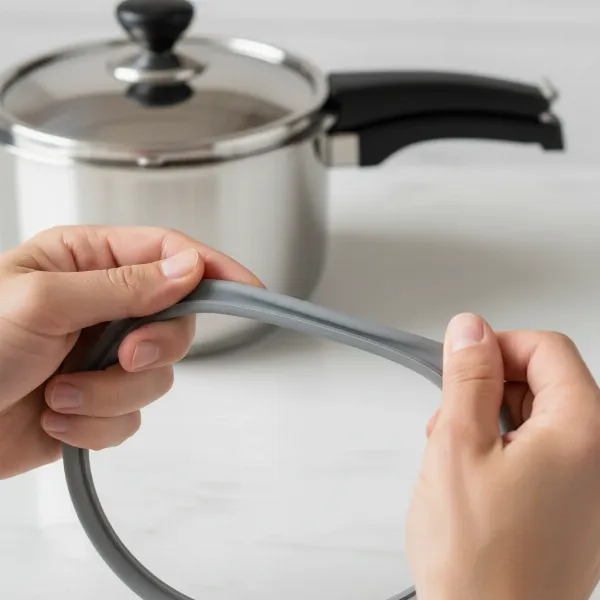 Hands performing a snap test on a pressure cooker gasket, showing elasticity.
How Often Should You Replace Your Pressure Cooker Gasket?
The lifespan of a pressure cooker gasket varies depending on several factors, but general guidelines exist. Many manufacturers and experts recommend replacing the gasket at least once a year, regardless of perceived wear. For those who use their pressure cooker frequently—multiple times a week—or subject it to heavy-duty cooking, replacement every 6-12 months might be more appropriate. Even if you don’t notice overt signs of damage, the material degrades over time due to repeated heat and pressure cycles. Consulting your pressure cooker’s owner’s manual is always the best practice, as it will provide specific recommendations for your model.
Extending Your Gasket’s Life: Essential Maintenance Tips
While replacement is inevitable, proper care can significantly prolong your gasket’s effectiveness and reliability.
Proper Cleaning After Every Use
After each use, remove the gasket from the lid and wash it thoroughly in warm, soapy water. This removes food particles and oils that can degrade the material over time. Gently dry it with a towel before storing.
Storage Best Practices
To prevent premature wear, store your pressure cooker with the lid inverted on top of the pot. This allows air circulation and prevents the gasket from being constantly compressed, helping it retain its shape and elasticity. Some prefer to store the gasket separately, loose in the bottom of the pot.
What to Avoid: Harsh Cleaners and Dishwashers
Never put your gasket in the dishwasher, as the intense heat and harsh detergents can accelerate material degradation. Similarly, avoid using abrasive cleaners or bleach, which can weaken the rubber or silicone. Stick to mild dish soap and warm water. Refrain from pulling or stretching the gasket unnecessarily during cleaning or handling, as this can weaken it and cause tears.
When to Restore vs. Replace
In some cases, if a gasket is merely starting to dry out without visible cracks, a thin coat of vegetable oil can help restore its moisture. However, this is a temporary fix. Once cracks, tears, or significant changes in texture and performance occur, restoration is no longer an option; immediate replacement is necessary for safety and efficiency.
Choosing the Right Replacement Gasket
When it’s time to replace your gasket, precision is key. Always refer to your pressure cooker’s manual to identify the exact size and type of replacement gasket needed. Gaskets are not universally interchangeable; using the wrong size or material can lead to an improper seal and compromise safety. Most modern gaskets are made of high-quality silicone, which offers excellent durability, heat resistance, and odor resistance. It’s also a wise idea to keep a spare gasket on hand, so you’re never caught off guard when your current one decides to retire.
Step-by-Step Gasket Replacement Guide
Replacing a pressure cooker gasket is a straightforward process that anyone can do:
- Remove the Old Gasket: Carefully peel the old gasket out of the groove in the lid. It might be a bit stiff or sticky if it’s degraded.
- Clean the Groove: Thoroughly clean the gasket groove in the lid, ensuring no food residue or debris remains. This ensures the new gasket seats perfectly.
- Inspect the New Gasket: Before installing, quickly check your new gasket for any manufacturing flaws or damage.
- Install the New Gasket: Gently stretch and press the new gasket into the groove around the inner rim of the lid. Ensure it lies flat and evenly, with no twists or buckles. Some gaskets have a specific orientation (e.g., words facing up); follow your manufacturer’s instructions.
- Test the Seal: After installation, perform a water test (check your manual for specific instructions) or simply try closing the lid. It should feel secure, but not overly difficult to lock.
Common Gasket-Related Problems and Troubleshooting
Even with a new gasket, issues can sometimes arise.
- Lid Difficult to Open/Close: If the lid is hard to open or close, ensure the gasket is seated correctly and not twisted. A new gasket might be stiff initially but should ease up with a few uses.
- Gasket Stuck/Melted: This usually indicates a severely old or overheated gasket. Carefully remove any melted residue after soaking the lid in hot, soapy water. Never force it, and ensure all parts are clean before installing a new gasket.
- Steam Leaking, Gasket Looks Okay: Re-examine the gasket closely for tiny tears or imperfections. Perform the “snap test” to check for internal degradation. Also, inspect the pressure release valve and other lid components, as they could also be the source of leaks.
Your pressure cooker gasket is a critical safety and performance component that deserves regular attention. By understanding the signs of wear, following proper maintenance, and replacing it proactively, you ensure your pressure cooker operates safely and efficiently, yielding perfectly cooked meals every time. Don’t let a worn gasket compromise your pressure cooking experience; make its care a priority!
Frequently Asked Questions
How often should a pressure cooker gasket be replaced, even if it looks fine?
Even without visible damage, it is generally recommended to replace your pressure cooker gasket annually, or every 12-24 months for less frequent use, as the material degrades over time due to heat and pressure. Always consult your specific cooker’s manual for manufacturer guidelines.
Can I clean my pressure cooker gasket in the dishwasher?
No, it is highly recommended to hand wash your pressure cooker gasket with warm, soapy water. The high heat and harsh detergents in dishwashers can cause the gasket material to degrade, become brittle, or lose its elasticity prematurely.
What is the “snap test” for a pressure cooker gasket?
The “snap test” involves gently stretching a 3-inch section of your gasket to about 5 inches, then releasing it. A healthy gasket should snap back to its original shape in under one second. If it returns slowly or remains wavy, it indicates the gasket has lost its elasticity and needs replacement.